> ## Documentation Index
> Fetch the complete documentation index at: https://laminar.sh/docs/llms.txt
> Use this file to discover all available pages before exploring further.
# Alerts
**Alerts turn signal activity into notifications.** When an alert fires, Laminar drops the notification into the in-app notification center and, if configured, sends it to Slack and email.
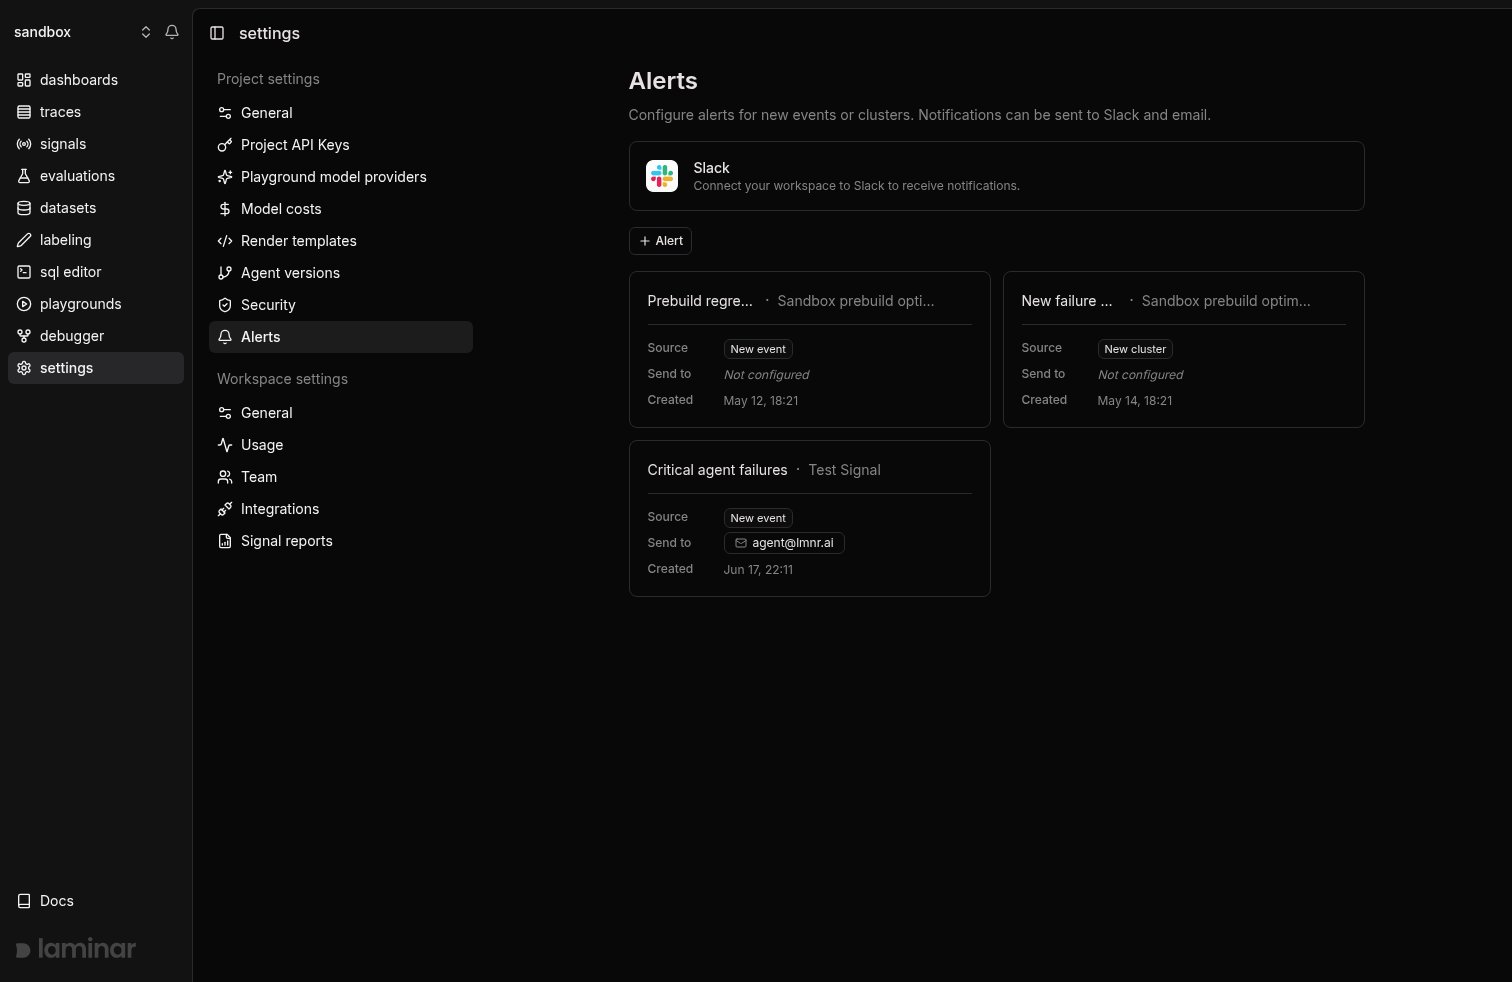 Alerts live at the project level. Open **Project Settings > Alerts** to see every alert configured for the project, or create one from scratch. You can also manage a single Signal's alerts in place: open the Signal, click **Settings**, and switch to the **Alerts** section to see and edit the alerts scoped to that Signal without leaving the page.
## Defaults on signal creation
Creating a new Signal auto-creates two alerts so you start receiving notifications immediately:
1. A **New event** alert on the new Signal, scoped to **Critical** severity, with [*skip similar events*](#skip-notifications-for-similar-events) on.
2. A **New cluster** alert on the new Signal.
Both alerts default to in-app notifications only. To route to Slack or email, open **Project Settings > Alerts** and edit the alert.
## Alert types
Each alert has one of two triggers:
* **New event**: fires when a new event is extracted for the selected Signal. Filter by severity and, optionally, skip semantically similar events.
* **New cluster**: fires when a new [cluster](/docs/signals/clusters) is created for the selected Signal. Useful for spotting failure modes that did not exist yesterday.
Both trigger types are scoped to a single Signal. To cover multiple Signals, create one alert per Signal.
## Severity levels
`New event` alerts fire only on events whose severity is included in the alert's severity set. Pick any combination of:
* **Info**: low-severity events. Useful for low-volume signals where every event is interesting.
* **Warning**: mid-severity events.
* **Critical**: the highest severity. This is the default for alerts auto-created with a Signal.
The severity of each individual event is set by the Signal's extractor based on the Signal's prompt. A good way to learn what each level looks like on your data is to inspect a few events on the Signal detail page.
## Output schema filters
`New event` alerts can narrow further than severity. **Output schema filters only notify when an event's extracted output matches the conditions you set.** The available fields come straight from the Signal's structured output schema, so an alert can fire on, say, `error_type = "timeout"` while ignoring every other error.
Alerts live at the project level. Open **Project Settings > Alerts** to see every alert configured for the project, or create one from scratch. You can also manage a single Signal's alerts in place: open the Signal, click **Settings**, and switch to the **Alerts** section to see and edit the alerts scoped to that Signal without leaving the page.
## Defaults on signal creation
Creating a new Signal auto-creates two alerts so you start receiving notifications immediately:
1. A **New event** alert on the new Signal, scoped to **Critical** severity, with [*skip similar events*](#skip-notifications-for-similar-events) on.
2. A **New cluster** alert on the new Signal.
Both alerts default to in-app notifications only. To route to Slack or email, open **Project Settings > Alerts** and edit the alert.
## Alert types
Each alert has one of two triggers:
* **New event**: fires when a new event is extracted for the selected Signal. Filter by severity and, optionally, skip semantically similar events.
* **New cluster**: fires when a new [cluster](/docs/signals/clusters) is created for the selected Signal. Useful for spotting failure modes that did not exist yesterday.
Both trigger types are scoped to a single Signal. To cover multiple Signals, create one alert per Signal.
## Severity levels
`New event` alerts fire only on events whose severity is included in the alert's severity set. Pick any combination of:
* **Info**: low-severity events. Useful for low-volume signals where every event is interesting.
* **Warning**: mid-severity events.
* **Critical**: the highest severity. This is the default for alerts auto-created with a Signal.
The severity of each individual event is set by the Signal's extractor based on the Signal's prompt. A good way to learn what each level looks like on your data is to inspect a few events on the Signal detail page.
## Output schema filters
`New event` alerts can narrow further than severity. **Output schema filters only notify when an event's extracted output matches the conditions you set.** The available fields come straight from the Signal's structured output schema, so an alert can fire on, say, `error_type = "timeout"` while ignoring every other error.
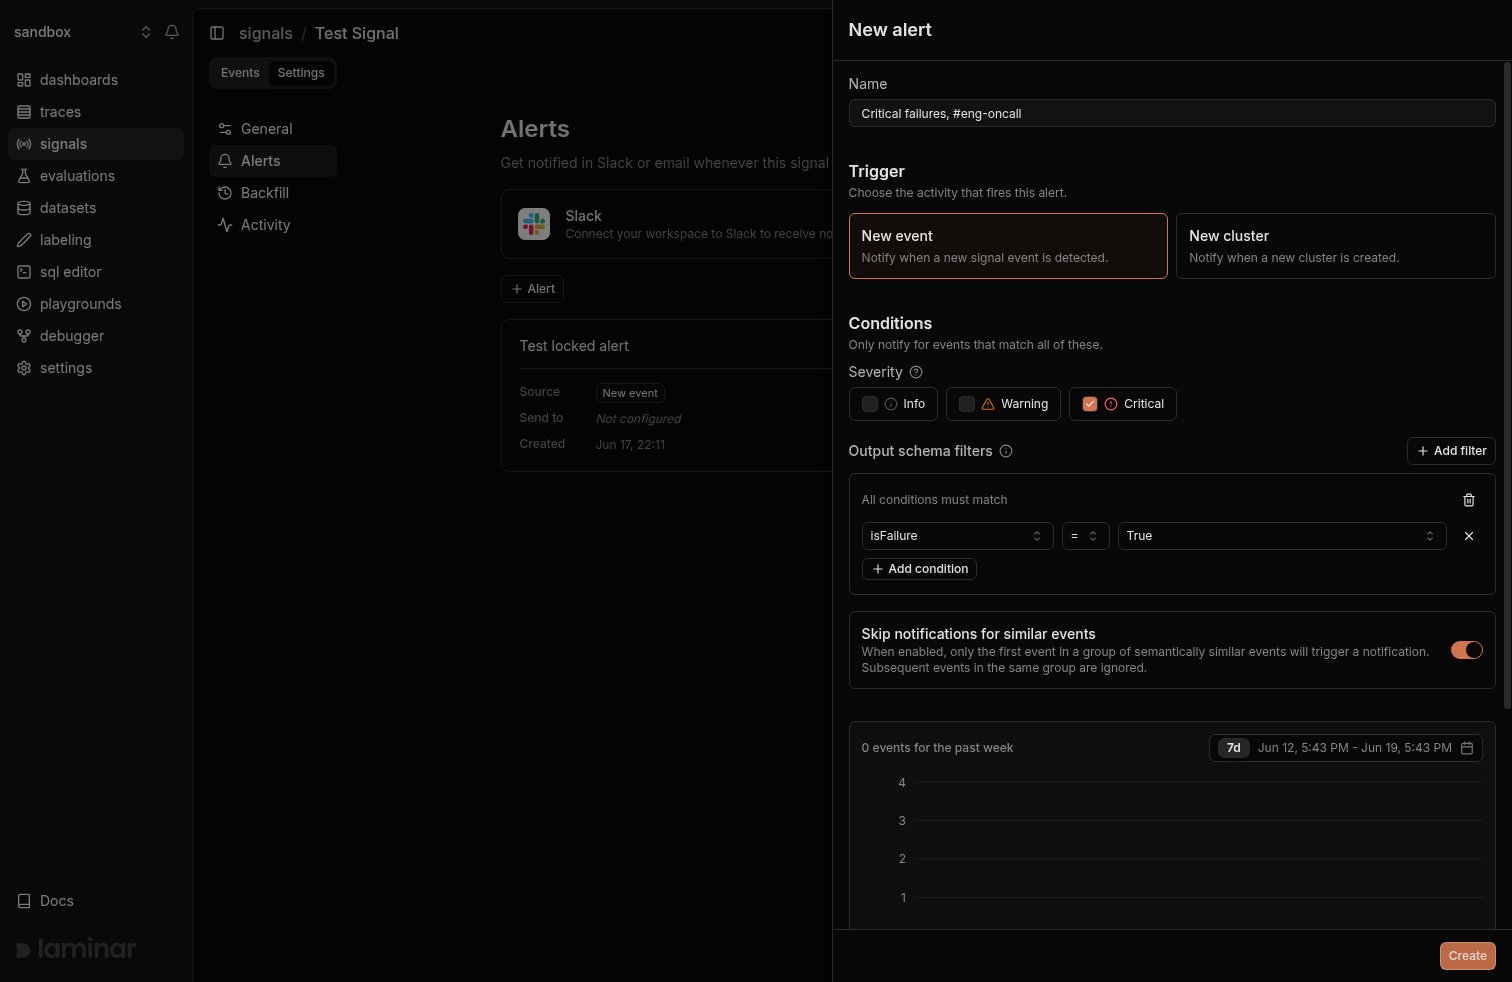 * Click **Add filter** to start a condition group, then **Add condition** to add more conditions within it.
* Conditions inside one group are AND-combined: all of them must match (the group header reads **All conditions must match**).
* Add more groups to OR them together: an event triggers the alert if it matches any one group.
* Field types follow the schema: numbers compare with `=`, `>`, `<`; booleans and enums offer their allowed values; strings match on substring.
With no filters, the alert fires on every matching event. If the Signal has no output fields, there is nothing to filter on and the section stays empty.
## Skip notifications for similar events
`New event` alerts have an optional **Skip notifications for similar events** toggle. When enabled, only the first event in a group of semantically similar events triggers a notification. Subsequent events in the same group are suppressed.
Turn this on when a Signal fires often on repetitive cases (the same timeout loop, the same tool error) and you only want to know about new failure modes. Turn it off when every event is worth paging.
## Notification channels
Every alert posts to the in-app notification center by default. Slack and email are optional and configured per alert.
### Slack
Slack messages contain the signal name, the extracted payload fields, and a link to the trace. Connect Slack once per workspace from **Workspace > Integrations** (see [Slack integration](/docs/platform/integrations)) or from the Alerts settings page.
### Email
Email alerts go to the subscribed user's address. Each user manages their own email subscription from the alert's edit form.
## Create an alert
1. Open **Project Settings > Alerts** and click **+ Alert**.
2. Fill in the form:
* **Trigger**: *New event* or *New cluster*.
* **Name**: a descriptive label (*"Checkout failures, #eng-oncall"*).
* **Signal**: the Signal the alert watches. A preview chart shows how often the notification would have fired recently so you can gauge the expected volume.
* **Severity** (new-event alerts only): select among Info, Warning, Critical.
* **Skip notifications for similar events** (new-event alerts only): on or off.
* **Slack channel**: Pick a channel to post into and click **Test** to send a sample message.
* **Email**: toggle on to receive emails at your workspace email address.
3. Click **Create**. The alert is active immediately.
### Edit or delete
In **Project Settings > Alerts**, use the row actions to edit or delete an alert. Edits take effect on the next matching event; deletes are immediate.
## Enable or disable an alert
Every alert card in **Project Settings > Alerts** has a switch that turns the alert on or off in place. Turn it off to pause notifications without losing the alert's configuration: the trigger, severity set, filters, and channels are all kept, and the card moves to a dimmed state with the switch off. Turn it back on and notifications resume on the next matching event.
* Click **Add filter** to start a condition group, then **Add condition** to add more conditions within it.
* Conditions inside one group are AND-combined: all of them must match (the group header reads **All conditions must match**).
* Add more groups to OR them together: an event triggers the alert if it matches any one group.
* Field types follow the schema: numbers compare with `=`, `>`, `<`; booleans and enums offer their allowed values; strings match on substring.
With no filters, the alert fires on every matching event. If the Signal has no output fields, there is nothing to filter on and the section stays empty.
## Skip notifications for similar events
`New event` alerts have an optional **Skip notifications for similar events** toggle. When enabled, only the first event in a group of semantically similar events triggers a notification. Subsequent events in the same group are suppressed.
Turn this on when a Signal fires often on repetitive cases (the same timeout loop, the same tool error) and you only want to know about new failure modes. Turn it off when every event is worth paging.
## Notification channels
Every alert posts to the in-app notification center by default. Slack and email are optional and configured per alert.
### Slack
Slack messages contain the signal name, the extracted payload fields, and a link to the trace. Connect Slack once per workspace from **Workspace > Integrations** (see [Slack integration](/docs/platform/integrations)) or from the Alerts settings page.
### Email
Email alerts go to the subscribed user's address. Each user manages their own email subscription from the alert's edit form.
## Create an alert
1. Open **Project Settings > Alerts** and click **+ Alert**.
2. Fill in the form:
* **Trigger**: *New event* or *New cluster*.
* **Name**: a descriptive label (*"Checkout failures, #eng-oncall"*).
* **Signal**: the Signal the alert watches. A preview chart shows how often the notification would have fired recently so you can gauge the expected volume.
* **Severity** (new-event alerts only): select among Info, Warning, Critical.
* **Skip notifications for similar events** (new-event alerts only): on or off.
* **Slack channel**: Pick a channel to post into and click **Test** to send a sample message.
* **Email**: toggle on to receive emails at your workspace email address.
3. Click **Create**. The alert is active immediately.
### Edit or delete
In **Project Settings > Alerts**, use the row actions to edit or delete an alert. Edits take effect on the next matching event; deletes are immediate.
## Enable or disable an alert
Every alert card in **Project Settings > Alerts** has a switch that turns the alert on or off in place. Turn it off to pause notifications without losing the alert's configuration: the trigger, severity set, filters, and channels are all kept, and the card moves to a dimmed state with the switch off. Turn it back on and notifications resume on the next matching event.
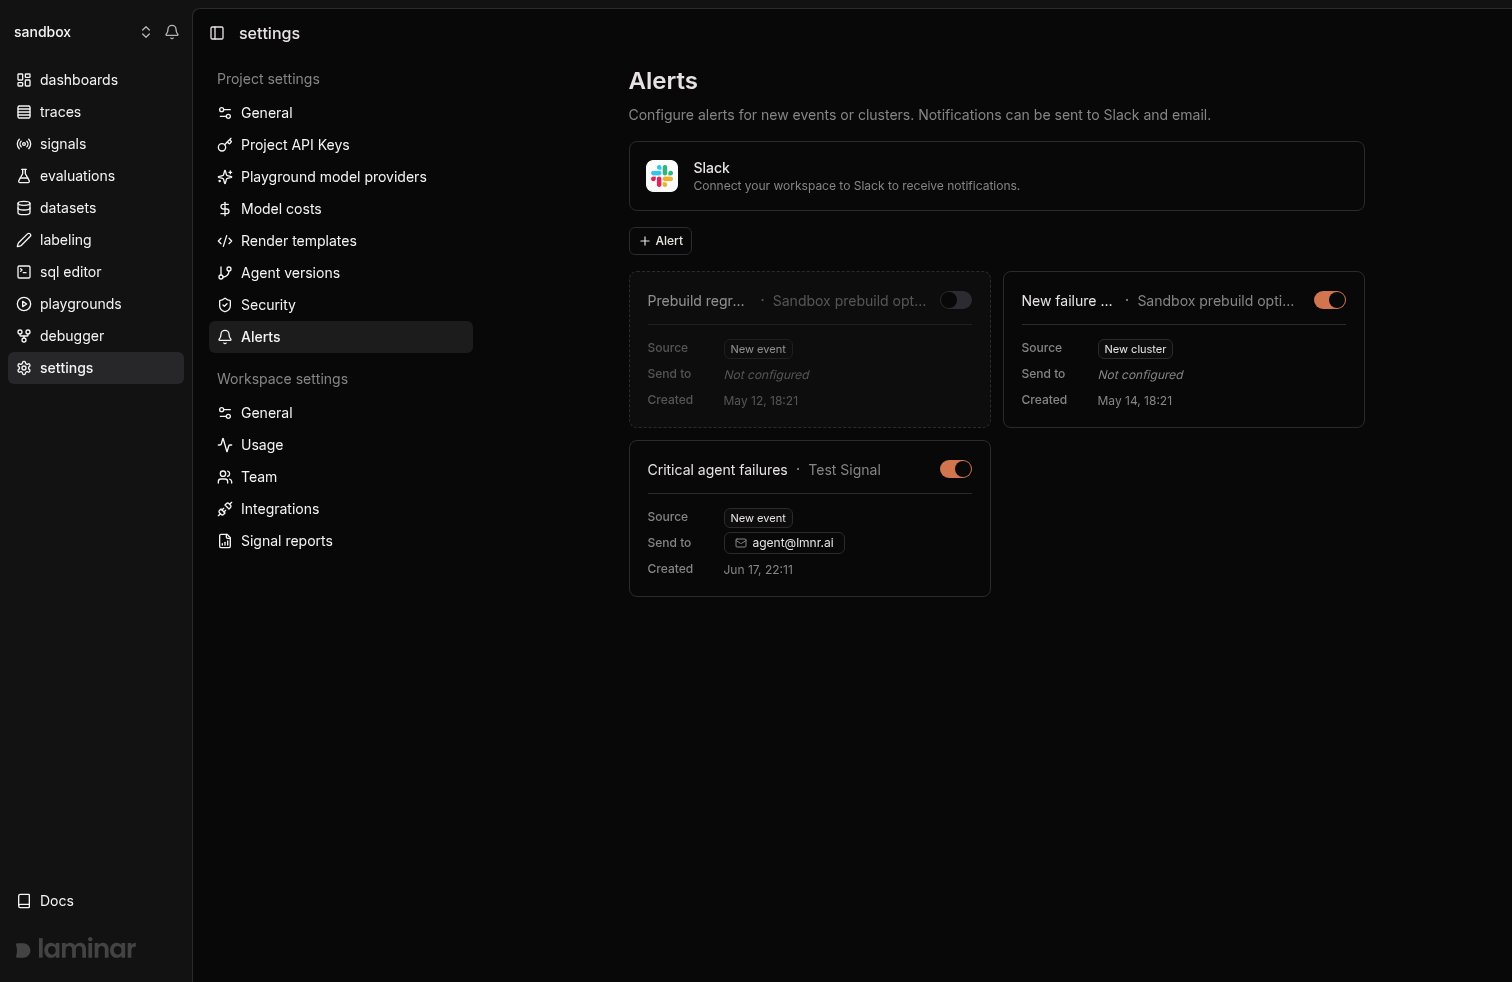 The same control is available as an **Active** switch at the top of the alert's edit form.
Disabling an alert only silences notifications. The Signal it watches keeps evaluating traces and producing events; to pause the Signal itself, use the Signal's own [Active switch](/docs/signals/quickstart#pause-and-resume-a-signal).
## Reports vs Alerts
Alerts fire on individual signal events or new clusters. [Reports](/docs/signals/reports) send periodic summaries of signal activity across a workspace. Use alerts to *page on things you need to see now*; use reports to *keep a daily or weekly pulse*.
## Next steps
Connect Slack so alerts can post to a channel.
Receive daily and weekly summaries of signal activity.
The same control is available as an **Active** switch at the top of the alert's edit form.
Disabling an alert only silences notifications. The Signal it watches keeps evaluating traces and producing events; to pause the Signal itself, use the Signal's own [Active switch](/docs/signals/quickstart#pause-and-resume-a-signal).
## Reports vs Alerts
Alerts fire on individual signal events or new clusters. [Reports](/docs/signals/reports) send periodic summaries of signal activity across a workspace. Use alerts to *page on things you need to see now*; use reports to *keep a daily or weekly pulse*.
## Next steps
Connect Slack so alerts can post to a channel.
Receive daily and weekly summaries of signal activity.